1. Nuxt.js 호스트 및 포트 특징
호스트는 기본적으로 호스트 머신에서만 접근 가능한 localhost 로 설정되어 있습니다.
외부 장치에서 접근하기 위해서는 호스트를 수정해야 합니다.
호스트를 '0.0.0' 이나 '0' 으로 설정 시 로컬 IP 주소가 Nuxt App 호스트에 할당되어 외부에서도 접근할 수 있게 됩니다.
포트는 기본적으로 3000번이 할당되지만,
Nuxt App 기동 이전에 이미 3000번 포트가 점유되어 있다면 점유되지 않은 포트 번호를 할당 받습니다.
포트에 문자열 값 '0' 이 할당되면 Nuxt App 에 임의의 포트 번호가 할당됩니다.
2. Nuxt.js 호스트 및 포트 수정
호스트와 포트 번호를 설정하는 방법에는 세 가지 방법이 있습니다.
각각 방식을 설명 드리겠습니다.
1) nuxt.config.js 설정
  // Server setup
  server: {
    host: '0',
    port: '0'
  }
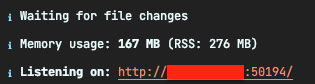
다음은 실행 화면입니다.
IP Local IP 주소가 할당되고, 임의의 포트 번호가 할당된 것을 확인할 수 있습니다.
Local IP 주소는 가려놓은 점 양해 부탁드립니다.
nuxt.config.js 파일에서 수정할 수 있지만 사이트를 호스팅할 때 문제가 발생할 수 있습니다.
따라서 파일을 직접 수정하는 것은 권장되지 않습니다.
대신 명령어를 통해 호스트와 포트를 직접 설정하는 방식을 대안으로 사용할 수 있습니다.
2) 명령어 설정
서버를 기동할 때 명령어를 통해 호스트와 포트 정보를 직접 설정합니다.
HOST=0 PORT=8000 npm run dev
3) package.json 설정
매 번 명령어에 호스트와 포트 정보를 입력하는 것도 일입니다.
package.json 에 있는 명령어 설정 자체를 수정할 수 있습니다.
  "scripts": {
    "dev": "nuxt --hostname '0' --port 8000",
    "build": "nuxt build",
    "start": "nuxt start",
    "generate": "nuxt generate"
  },
본 문서는 Nuxt 공식 문서를 참고하여 작성되었습니다.
https://nuxtjs.org/docs/features/configuration/#edit-host-and-port
Configuration
By default, Nuxt is configured to cover most use cases. This default configuration can be overwritten with the nuxt.config.js file.
nuxtjs.org
오늘도 행복한 하루 보내세요.
감사합니다.
'Nuxt2 > 실습' 카테고리의 다른 글
| #3 실습용 백엔드 API 서버 구성 (0) | 2022.10.29 |
|---|---|
| #2 TypeError: this.libOptions.parse is not a function at ESLint8Plugin.<anonymous> (0) | 2022.10.29 |
| #1 Error: error:0308010C:digital envelope routines::unsupported 해결 (0) | 2022.10.29 |